2024

Or perhaps I should say my bees are under attack. Today is the 30th of August. It’s a Friday morning and a lot has happened in the last 24 hours. I had better start at the beginning . . .

I have an out apiary on the ridge in Hastings not far from the Conquest hospital. Last Tuesday (27th August) I looked through the supers on my 7 colonies trying to see what sort of honey crop I had. I then added my clearer boards. I was in the apiary for an hour and saw no hornets. On Wednesday (28th August) I went up and fetched 13 supers to extract at home. I had to go to the apiary twice as my new Dacia, despite its capacious boot, cannot accommodate that many supers. All was quite normal in the apiary and the bees were busy. By 1130am I had all the supers back home.

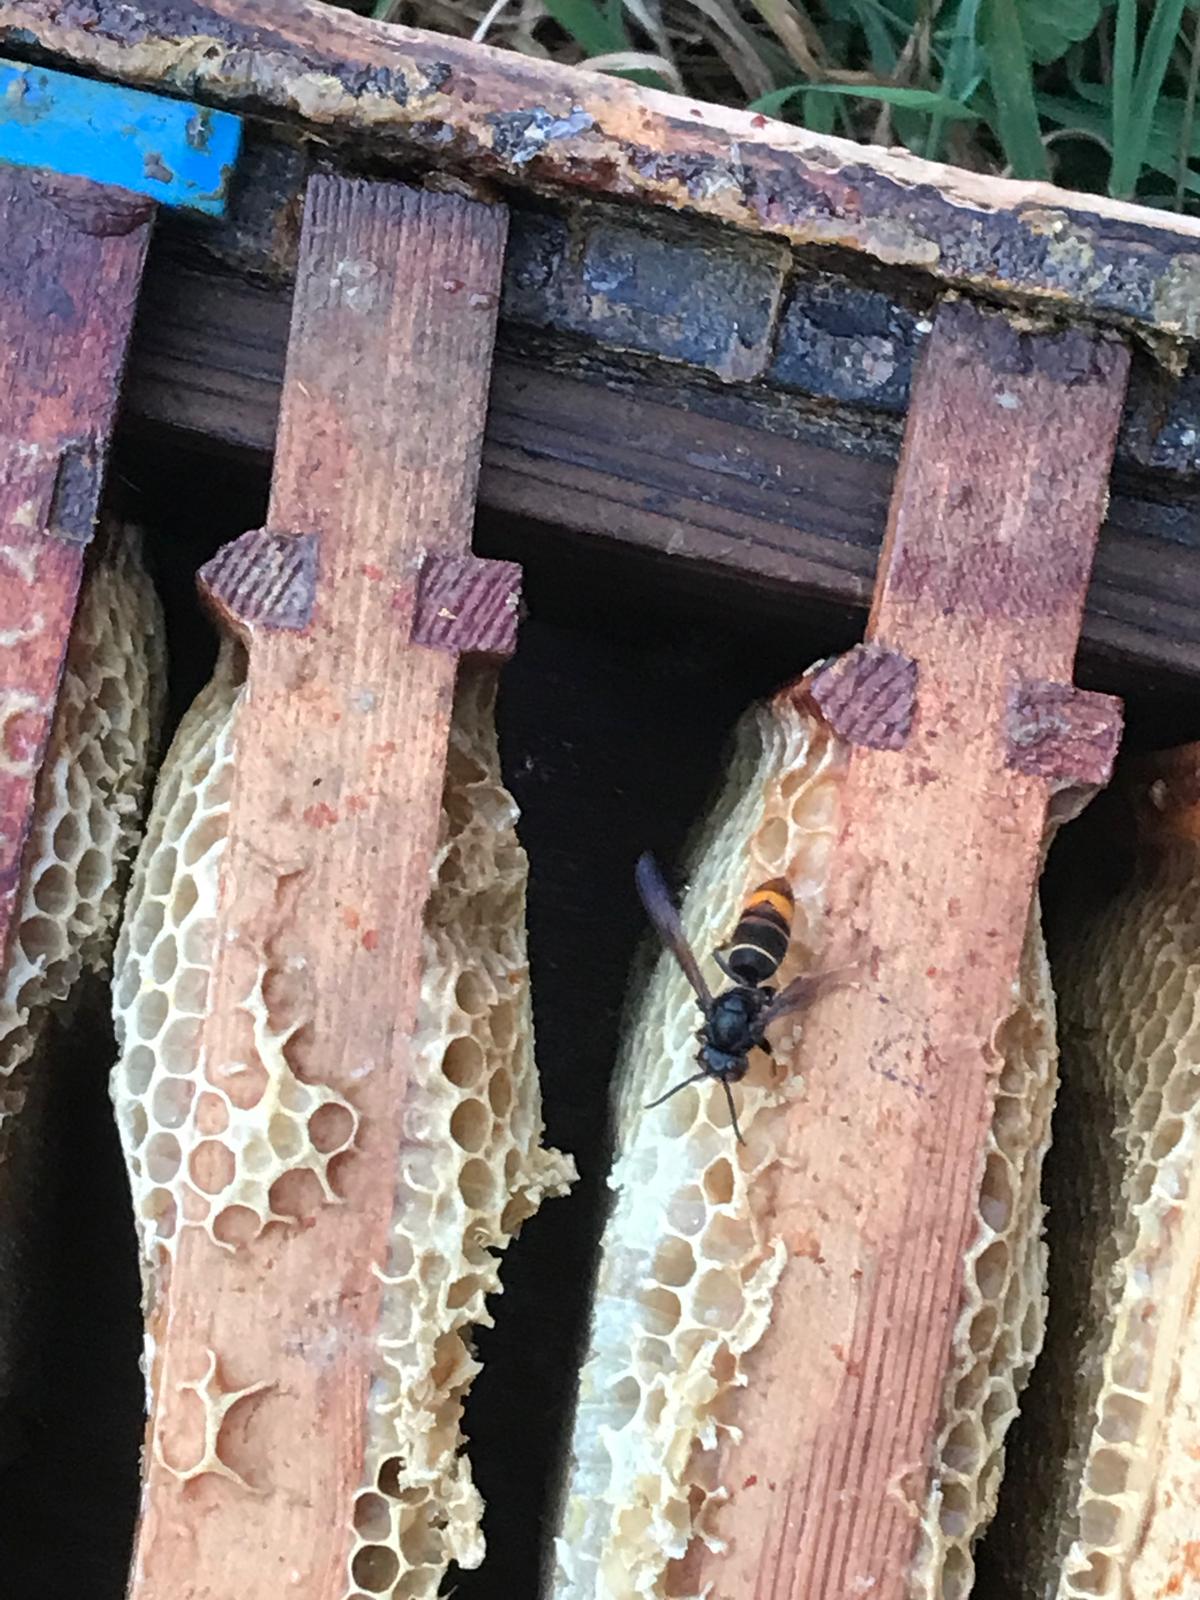
Wednesday was a long day of extraction and Lesley and I eventually finished at 7pm. It was a hot day with no breeze and the evening was a still one. It was not yet dark. I took my first 6 supers back and by 730pm was placing them back on my hives. Some supers I had to walk a little way down the field, placing them on a crown board near the hive from which they had come. The smoker was lit and I was preparing to lift my clearer board off the hive at the very bottom of the field. I was aware of a low whirring sound. And there she was. A dreaded Asian hornet evidently interested in having a sweet treat.
I have been to all the lectures and read all the articles but somehow it was still a surprise. I unzipped my bee suit and got out the phone and started to take pictures. I need photographic evidence, I thought, otherwise I may not be believed. Having gathered the necessary photographic evidence I swatted the thing, I must confess. The force of my blow severed the head and thorax from the abdomen, snapping the hornet in half at the petiole. What was rather gruesome was the that the head and thorax and wings still functioned and walked around on the super. My big mistake was not trying to collect this specimen for the bee inspectors so genetic analysis could be done. I am afraid I rather recoiled in horror at the head walking towards me and just flicked it back into the super. Then I became aware of another whirring sound at an adjacent hive: there was indeed a second Asian hornet hawking for protein. So Peter Coxon is right after all - I am in the front line here in St Leonards and have now the dubious claim to be the first one with bees under attack from the Asian hornet, At 7:40pm I headed home, told Lesley the bad news and then returned with the next 7 supers. By then it was getting dark and I had to return the supers by using the headlights of the car to light up the hives; as before, my smoker billowing out smoke so as to drive the bees back down into their brood boxes before placing the supers back on the hives.
Well at least the Asian hornets don’t hawk at night, I thought, so any young bees that end up outside the hive will have time to make it back in before morning without falling prey to a hornet.

Once back home Lesley wanted to see the photos. They were clear. It really was an Asian hornet. I have the hornet app on my phone and so we started the process of reporting a sighting. The process was complicated by the fact that the app is so clever that it wanted to record the sighting at our home address as the app evidently knew where we were. This took some time to sort. If any of you have an out apiary and see the hornet, try and report the sighting in your apiary - it’s easier. It then gives the bee inspectors an accurate grid reference of exactly where your hives can be found.
We uploaded three photos and then for good measure I also sent a message and photos to our new High Weald bee inspector, Helen Hadley (if you have a direct line to God, why not use it?), and also to our seasonal bee inspector, Dan Morgan.

At 1030am on the 29th of August I missed a call. It was the regional bee inspector. He was wanting details of how to find the apiary. I left him a voicemail and a message with the address of the farm where I keep my bees. I also sent the address to Helen and Dan for good measure. The seasonal bee inspector then phoned me at about 11am and then again at 12pm to say he was sending over two inspectors  from Ashford and they would be there in a couple of hours, was that ok? You bet your bottom dollar that was ok by me! At about 1230pm Lesley and I made our way up to the apiary. To be honest I was dreading what I might find. We told the owner of the farm and the farm shop that inspectors would be arriving and then we went down the field. Nothing, niet, nada. Not an Asian hornet to be seen. Several European hornets but NO Asian hornets! Then after about an hour and a half, I spotted one and then Lesley spotted another about a half hour after that.

While waiting for the inspectors I removed the clearer boards. Then I made my way up the field and waited in the car park in my bee suit. The ‘inspectors’ arrived soon after and I led them around the back of the farm shop and the hangars where tractors and equipment are kept and they then drove me down the field. They wanted to know who Lesley was as they certainly didn’t want this turning into some sort of circus with uninvited beekeepers milling around and getting in the way.

Almost immediately they started setting up bait stations (about 5 of them).

We discovered Stewart Westsmith was a bee inspector ( he covers Surrey and the surrounding counties) but that John was in fact employed by the NNSS and is an expert on amphibians and reptiles. He was however in charge of destroying any nests that are found. Evidently he had been seconded to that job and was enjoying working outside. Helen had asked me to put out a bait station and as I had some trappit I had done so but the bait station was attracting no interest whatsoever. At some point what looked like a butterfly net appeared and we started looking for Asian hornets. Still nothing and then of course frustratingly while Stewart went off to place a bait station, Lesley spotted one. The waiting game started again and then finally about 15 minutes later Lesley spotted another one and Stewart caught it in his net.

Introducing an Asian hornet to the bait trap

He didn’t want to kill it, he just wished to get it feeding on trappit as he needed this Asian hornet to become addicted to this sweet treat. She took some convincing, I can tell you. Droplets of trappit had to be smeared across the mesh of the butterfly net to convince this Asian hornet to feed. At one point it looked as if she was going to bite through the mesh! But finally she realised what she was meant to do and she started licking up the trappit.

The Asian hornet refuses to take the bait

This Asian hornet has finally understood what she is meant to be doing and is licking up the bait
She seems to like it afterall

Stewart had her in his net in the middle of the field as he was going to release her and see if he could see what direction she flew off in. When eventually after 15 minutes or so he did release her she flew around in circles and none of us did get a clear idea of what direction she headed off in. She flew towards the hives. She flew back in our direction. She landed in the grass. She took off again and flew around us, then she seemed to land in the grass and we just lost sight of her. Today (August 30th) Stewart and John are coming back with a team of inspectors, several from Scotland as he is training them. I believe there are also going to be people from a company called pollenize who are going to be placing bait stations and a mobile phone or two which is meant to be able to detect Asian hornets.

Saturday 31st. I went up to my apiary in the morning  to reduce entrances on some hives. The inspectors were elsewhere and no sign of any Asian hornets. Their bait traps contained wasps.  Late afternoon Stewart rang me to say they had located the nest 700m from my apiary. One of the bait stations placed somewhere in the direction of the line taken the previous day had contained 5 hornets on Saturday morning and from there they were able to time and then work out the location of the nest. Presumably those five hornets had got a taste for the bait and then came back for more and that enabled them to time their return which in turn informed them about the distance of the nest(1 minute for every 100 metres).

They don’t destroy the nest, that is a job for another team. He mentioned they would use a cherry picker so access must be good. Sometimes this is not possible and they have to use a team of climbers. The nest was bigger than the size of a football. Evidently a secondary nest that would soon be raising gynes hence the urgency to locate and destroy it. I am told by Helen that at this time of year the inspectors can be working on Saturdays and Sundays as well, as these nests are considered to be an ‘outbreak’.  Stewart and his team were staying in a hotel in Ashford and responding to any reported sightings. He had extra help with him as he was training a group of Scottish bee inspectors so they are prepared for what is to come. It seems to me that there is currently urgency to find these nests before our countryside gets peppered with mated gynes capable of establishing colonies next Spring. So everyone needs to be vigilant. September/October is when gynes are raised (please correct me if I am wrong). I am writing this article so everyone is on the qui vive. One should put out bait stations in one’s apiary and look at your hives early in the morning and late in the evening. If you are in an area where there has been a nest destroyed, definitely put out bait traps in March to catch Asian hornet queens and these will have  to be killing traps in my opinion.

Lessons learned

  • If you trap or kill an Asian hornet keep it so the body can be analysed.
  • Report your sighting on your phone on the Asian hornet app in your apiary - this gives the bee inspectors the accurate location of your hives In preparation use the internet to get an accurate location of your apiary with a grid reference and write it on your hive records
  • Know the phone numbers of your seasonal bee inspectors so they can be informed immediately - Dan Morgan 07500 954390 - Helen Hadley 07871 320316
  • Take photographic evidence if at all possible
  • Have some traps ready
  • At this time of year make sure any traps are not blocked by leaves
  • Have a bottle of trappit in your bee shed (High Weald members have been able to obtain this this year at one of our Horsted sessions)
  • Talk to any landowners of an out apiary about track and trace and what happens. It’s important those inspectors get access.

Malcolm Wilkie

St Leonards on Sea


Postscript - Timeline

  • Wednesday evening 28-Aug-24
    Malcolm spotted Asian Hornet and photographed it
    Reported the sighting
  • Thursday morning 29-Aug-24
    Bee Inspector called Malcolm
    Thursday afternoon Bait stations put out
  • Friday 30-Aug-24
    Bee Inspectors continue to track trapped hornets
  • Saturday 31-Aug-24
    Bee Inspector called Malcolm to say that nest had been located about 700meters away from the apiary
  • Tuesday  03-Sep-24
    Nest destroyed
    Monitoring to continue for five days

I have done some videos to explain the next stages of the Queen rearing process. There were 8 Queen cells and I managed to harvest 7 of them. Ideally, I would have liked the cells to have been riper and going brown at the tips. Bees raising Queen cells in a large box start them at different times so these Queen cells will all be at different stages of their development.

With the second round of Queen rearing the Queen cells should all be roughly about the same age as the bees in this hive will have no other choice but to make Queens on the frame of brood taken from the hive next door. As the frame of brood and eggs was placed in this big colony on the 10th of May the Queen cells should be hatching on the 21st if 2-day old larvae were used by the bees to make Queens. These Queen cells will be going brown at the tip if about to hatch. Any that are not like this will probably hatch two or three days later as the bees will have started them on larvae that hatched a day or two after the frame of brood was placed in the hive.

As I say on the videos I would not attempt this whole process, which is quite invasive, unless I had help at this stage with the harvesting of Queen cells. There is quite a bit of skill in loading up the apidea mating hives correctly and I have chosen to do this on the same day as the harvesting of Queen cells ; mainly because I have an out apiary and it is easier to do everything at the same time.

So, the process starts with the apidea mating hives. If you are interested only in the Queen rearing process you can skip this section but it is all part of the process and unless you can use these mini mating hives correctly, it will be difficult to get a mated Queen.

Cut up foundation and add strips to the frames in the mating hive. I use wax from a beeswax candle to secure the strip to the plastic frame. Place fondant in the feeder of the mating hive. Make sure the hole for the introduction of the Queen cell is aligned with the frames so you can actually introduce your Queen cell. Once you have harvested your bees and then want to introduce your Queen cell it won’t be possible to dismantle the apidea with bees inside in order to readjust the frames.

Photo 1:              Frames incorrectly aligned for the introduction of a Queen cell

Photo 2:              Frames correctly aligned for the introduction of a Queen cell.

Photo 3:              A makeshift repair on an apidea so a flap covers the hole - this prevents the bees climbing out while you are trying to introduce your Queen cell.

Photo 4:              as above

Photo 5:              The front door closed. If you try and harvest young bees and the door is open, they just walk out!

Photo 6:              The front door open. It would be a mistake to leave this open when loading up the apidea

Photo 7:              Making up the frames for the apidea

Photo 8:              as above

Photo 9:              as above

Photo 10:            as above

Photo 11:            as above

Photo 12:            as above

Photo 13:            A cheap mating hive. I have made a flap. In this photo the lid is incorrectly aligned

Photo 14:            In this photo the lid is correctly aligned

Photo 15:            Squares of tin foil cut up so a small hole is revealed - the tip of the Queen cell will protrude through this hole.

Photo 16:            as above

For harvesting young bees I use a large garden trug, a sprayer with water in it and a cup to measure out 300ml of bees. Too few bees and you are wasting your time as the virgin wont go out and mate, too many and the bees consider the mating hive too small and depart with your new virgin Queen to pastures new.

Familiarise yourself with how the apidea fits together. It is loaded up with young bees upside down and you see me doing this on the video. Choose if possible a frame of young bees which will be found on a frame of young larvae as these are the bees feeding the larvae. Be careful though as this may also be the frame where your Queen could be laying eggs. Best if at all possible to place the Queen in a clip

Photo 17:            Queen in a Queen clip

Photo 18:            Frame suitable to harvest young bees from as larvae can be seen

On the particular day these videos were taken there had been a huge nectar flow and so the young bees when shaken into the trug became covered in nectar. This actually made them easier to harvest as they could not easily fly up.

Top tips for loading up apideas

Make sure you know how to close up the floor quickly : cheap mating hives unlike apideas have floors that are more difficult to close so practise without bees first if you are using one of these

Make sure the hole in the lid aligns up properly with the alignment of the frames below

Make sure the front entrance is in the closed position

Use only fondant. You are turning this mating hive upside down and if you use syrup it will go everywhere and probably drown your bees!

Harvest young bees from a frame where you can see larvae. Young bees will live longer and they will have a Herculean task ahead of them to draw out the frames for your new virgin Queen.

Use a large garden trug and a sprayer. If the bees are slightly wet that is good as they will use that moisture to help eat the fondant. Don’t drench them however!

Once you have harvested your cupful of bees, align the mating hives up in a row near the Queen rearing colony as you will be adding cells one at a time to these mating hives.

If you are interested in the process, now look at the following videos taken by Lesley of me harvesting young bees

1 Photo:              A frame with larvae thus guaranteeing the harvesting of young bees

2 Video:               Young bees being harvested

3 Photo:              Apideas upside down ready to be loaded with young bees

4 Photo:              as above

5 Video:               Young bees being added to two apideas

6 Photo:              Queen in a Queen clip so she is not accidentally added to the apidea

7 Video:               Young bees not being used are returned to the hive

The harvesting of Queen cells

For my set up I used an empty 14x12 brood box to decant frames into as I searched for the Queen cells that the bees had made for me. I try and be as gentle as possible. I use a sharp Stanley knife to cut out the cells and I protect the cells with foil. I don’t harvest young bees from this colony as I feel the whole procedure is invasive enough for this particular colony.

Top tips for harvesting cells

  • Try and avoid long elongated Queen cells
  • Cut deep around a chosen Queen cell : you have to dig into other brood to properly harvest these emergency  cells.
  • Use smoke to clear the bees away from the cell you are working on
  • Some emergency cells can look small but they contain large Queens as the cell goes back into the frame.
  • Try and be organised and systematic. I struggle with this and you see me replace back into the hive a frame with a Queen cell which I then later have to go and pull out again.
  • Work gently and slowly
  • Have everything you need within easy reach
  • Work as a team

Now look at all the videos below.

1 Video:               Explanation of what I am going to do

2 Video:               Searching for  Queen cells by decanting the frames into another empty brood box

3 Video:               Queen cells being harvested from a frame

4 Video:               Harvesting a long thin Queen cell from the frame and a shorter one at the bottom of the frame. Foil is used to protect the cell

5 Video:               2 cells being harvested

6 Video:               A frame of brood and eggs from another colony being added. Reassembling the hive ; bees had been shaken off all the frames to ensure no Queen cells had been missed

I advise you to only attempt something so invasive to the bees if you have the help of at least one other person. The last video shows the bees all over the hive after frames have been shaken. These manipulations are not for the faint hearted. Everyone says they would like to do Queen rearing but it is an invasive process. I do it as I want several Queens from one particular colony.  My out apiary is on a ridge and windy (you can hear that) and often any new Queens don’t get well mated so I like to have options. If mated from our garden in St Leonard’s the Queens are usually gentle and prolific. There is nothing to stop you taking some of the lessons from the text and photos and videos below and harvesting a couple of Queen cells from your own hives when doing swarm control. Bees harvested from the same colony as the one from which the Queen cell comes, do not need the cell protected although using tin foil does help to easily wedge the cell into the mating hive and so I would recommend using a square of tin foil for that reason alone.

As with anything in beekeeping adapt what I have done for your own purposes. If you manage to get your head round what is required to make spare Queens, it will improve your beekeeping and understanding. And if you have raised a Queen yourself from a deliberate choice you have made, that feels good. However, once you have got your mated Queen then there is the further challenge of how to introduce her to a nucleus of bees as these small mating hives are only a staging post. They are to get a Queen mated and cannot be used to grow into a colony. My next email will look at the success of the mating hives - whether the Queen cells hatched and how successful the Queens were in getting mated.

For those interested in raising queens this is how I do it. Helen Hadley taught me, and I have read a lot of books. However, this is what works for me.

I am on 14*12 brood boxes. I build up a colony I like by adding a second brood box. I lift a frame of brood and stores into the top brood box and add a piece of foundation and a dummy board to help prevent the brood getting chilled. I place foundation below into the brood nest to make up for the frames I have lifted into the top box. The bees quickly draw out the frames of foundation particularly in the top box as there is heat rising from the brood in the bottom box. The next week I start adding frames of foundation to the top box. I may raise another frame of brood to encourage expansion. This process goes on for several weeks until I have two 14*12 brood boxes rammed with bees. I often have to give them a super as well to give them space.

Then when I feel it is the right moment, I find the queen and place her in a clip. I raise into the top box as much brood as I can and make sure there are eggs on which emergency queen cells can be made. Important that there are stores and,  if possible, a pollen bank.

I then turn the bottom brood box and entrance 180 degrees, so the entrance faces the woodland edge which all my hives back onto. I add a solid crown board. I add an eke with the entrance facing outwards in the same direction as the original entrance. I place an inspection board over where the original entrance would have been in order to prevent the bees going underneath the box. This encourages them to walk up and find the new top entrance. If I have a super I remove the queen excluder to encourage all these bees to collect me Spring honey.

After three days I go back and remove any sealed queen cell as it will probably have been made from a three-day old larva. I add a pollen pattie as shown me by Helen or any extra fondant/ food I have got. If there are cells in places too difficult to be harvested, I may remove them.

After 9 days (possibly 10 days) I go back and harvest cells.  My calculation is that there will be queens made from two-day old larvae. In a queenless box two-day old larvae are converted into emergency queens and sealed three days later. Then in 8 days’ time those cells will hatch. If I go in on day 9 then the queen cells will be ready to harvest and will no doubt hatch two or three days later.

This year I may harvest them all and put them in apideas. I will then do a second round of queen rearing using eggs from another hive or a frame of eggs taken from the queen in the bottom box. This will also mean these bees collect me more honey.

Once this second round of queen cells is complete, I will divide up the hive and make up nucs which will be taken to another apiary for the queens to get mated. One of these nucs will be used to requeen the original colony as the original queen will have produced a lot of brood and won’t make a strong colony going into winter.

Watch these videos. I have tried to be clear, but the process is complex, and I forget to mention certain things. However perhaps with the above written explanation plus the long videos showing the set up you will be able to work out how it is done.

Most of the queen cells from the first round I intend to harvest and put in apideas. Those from the second round will be used to make up nucs or add again to any apideas that destroyed the queen cell they were given.

I’ll let you know how I get on.

Malcolm Wilkie – May 2024